Thursday, 23 February 2017

HEY LOVES,,, YOU CAN DOWNLOAD THIS IMAGE HERE AND STUDY AT YOUR OWN CONVENIENT TIME... JUST RIGHT CLICK ON THE IMAGE AND SELECT VIEW IMAGE , THEN CLICK ON SAVE IMAGE AS...ITS SELF EXPLANATORY FROM SAVE IMAGE AS... THE IMAGE WILL BE AUTOMATICALLY
 SAVED TO YOUR SYSTEM OR MOBILE PHONE'S GALLERY!

PLEASE FEEL FREE TO DROP YOUR COMMENT OR ANY LOOK YOU WILL LIKE ME TO DO NEXT AND I'LL BE GLAD TO DO SO! 

While you're at it... PLEASE don't forget to click on the FOLLOW BUTTON AT THE RIGHT HAND SIDE OF THE POST... and also check out the PRODUCTS THAT I USED in this image and the VIDEO
 CLICK HERE TO WATCH THE VIDEO:  https://www.youtube.com/watch?v=4rdGOZkOkGI

 Thanks and God bless you all

Until my next post Bye for now!

PRODUCT USED IN EYESHADOW PLACEMENT VIDEO

 
 CLICK ON LINK BELOW TO WATCH THE TUTORIAL:
https://www.youtube.com/watch?v=4rdGOZkOkGI

   PRODUCTS                                                                        BRAND

POWDER AS TRANSITION COLOR                              CLASSIC FACEBOOK
RANDOM COLORFUL  EYE SHADOW PALETTE       BURGUNDY, DEEP BROWN AND RED
OUTER-CORNER OF THE EYES                                    THE ONE KAJAL
LID COLOR                                                                        L.A PRIDE BAKED SHADOW
EYELINER                                                                          FOREVER 53
MASCARA                                                                          MAYBELINE COLOSSAL
LIP PENCIL                                                                         KISS BEAUTY
LIPSTICK                                                                            MILANI CONCEALER IN BIEGE 03
LIPGLOSS                                                                           MAC LIPGLASS
FALSE EYELASHES                                                          RED-CHERRY


BRUSHES
RANDOM BLENDING BRUSH                                        FOR THE TRANSITORY COLORS
OUTER V-CORNER OF THE EYES                                  UNVEIL PRECISION BRUSH
LID COLOR                                                                         BHCOSMETICS FLAT HEAD BRUSH
LOWER LASH LINE                                                           AN ANGLED BRUSH
EDGES OF THE TRANSITION COLORS                         REAL TECHNIQUES BASE BRUSH
INNER-CORNER COLOR                                                  BOBBI BROWN PENCIL BRUSH


Thanks for watching the video... Please don't forget to subscribe and comment!

Bye for Now!

Tuesday, 21 February 2017

DIFFERENCE BTW BRONZER & CONTOUR


Hey Beauties ... How are you all doing today?... I often get this question from girls who are just starting to get into makeup, “What is the difference between Bronzer and Contour, The products and how to use each?"

 In this post, am going to be explaining what the difference is, how to use each and what to look out for when buying each. 

So, relax and enjoy your reading!

So first thing first .... Let's talk about the difference between the two " Bronzer & Contour." A general rule of thumb is that, bronzer typically have a little bit of shimmer that kind of gives a subtle light to the face. Bronzers are products that are literally darker versions of highlighters, bronzer gives you a subtle glow while highlighter gives you a tons of sparkles... like look at me am here kind of drama.. lol!

WHAT TO LOOK OUT FOR
When you are looking into buying a bronzer you should consider a few things.  First and foremost, bronzer can be either matte or shimmer, but in my personal opinion it is best to avoid large shimmer or glitter if you are going for a subtle glow.  

The matte bronzer will not add any glow to your face, what a matte bronzer will do to your face is to give your face a natural kind of finish look and can also be used as a contour product, 

 Next consider the color of your skin, fair ladies should avoid anything too orange tone,  Instead look for a more golden tones that will give you that warmth ... An image example is - https://encrypted-tbn2.gstatic.com/images?q=tbn:ANd9GcS5r-urA2hySurko0jHgmD6NWDhvg5FM-tcU8kf857Lx9dku6WI   and for the darker skin... orange or rose-gold tones will actually add a warmth and glow to your skin. An image example is  -  https://encrypted-tbn2.gstatic.com/images?q=tbn:ANd9GcSe1EASUJJQzxn08srEl5j8x49zCI2SNJ1CtgAnsRgcCdSNf53CNA


                                                                                                                HOW TO APPLY IT 
I like to use a large fan brush   to dust on the bronzer onto the highest point of my face cause that will give me a precise place to place the product without extending it to where its not needed... There are different ways to apply bronzer,  for instance... in the tear-duct area, as eyeshadow, brow bone, but a good rule of thumb is, to gently dust it onto the areas of your face that get hit by the sun/light the most, bridge of the nose, cheek-bone, chin, and a little on your fore-head but this is optional.

FOR CONTOUR
Nine out of ten, a contour product is going to be matte, the reason is you are using a contour product to kind of lift, sculpt and creating an illusion of shadow and also giving you an illusion of a  higher cheek bone... a really great example is Maybeline powder in cacao  https://encrypted-tbn1.gstatic.com/images?q=tbn:ANd9GcRdwUnvKtUmZ3vmoIMA20PKD6AzPZOdB5iK8SHqEJfIT1ALO02l3g  Note: No matter your skin color... always go for a contour products that is 2 shades darker than your skin color.

So, i typically like to use a small pointy brush, cause its easier to work under the cheekbones like the Real Techniques contour brush:  An image example is -  http://www.temptalia.com/wp-content/uploads/2013/08/realtechniques_contourbrush001.jpg  ... this brush has a really nice point to it.. it helps me find where the cheekbone is.

So, when next you go shopping, look for a contour product that has no shine to it... matte will help you sculpt and recede that area that you don't want obvious as oppose to if it has shimmer to it, it will only accentuate that area more instead of hiding it.

HOW TO PLACE BOTH IS DISPLAYED IN THE DIAGRAM ABOVE
Bronzers are place in the highest point of the face to catch light while contour is place under the cheekbone to create an illusion of a lifted cheek bone and other part of the face that you want to make less obvious and the application of contour depends on what face shapes you have.

So that's pretty much everything that you need to know about the difference between contouring and bronzing .... So, go out there and start bronzing and contouring your face for that easy and sculpted face!

Until my next post.... Bye for Now!

Tuesday, 14 February 2017

LIST OF PRODUCTS USED


https://youtu.be/p-0HkEy4bPw

PRODUCTS USED 
*N.Y.C CONCEALER AS EYESHADOW BASE
*1ST  TRANSITION COLOR " LILAC EYESHADOW FOR BHCOSTMETIC [5TH EDITION]
*2ND TRANSITION COLOR "BROWN WITH RED UNDER-TONE BHCOS [5TH EDITION]
*3RD TRANSITION COLOR " BROWN WITH A COOL  ''         ''  BHCOS [5TH EDITION]

LID COLOR
*CHAMPAGNE GOLD WITH SHEEN TEXTURE FROM BHCOSMETICS
*EYELINER---------------------- FOREVER 53
*FALSE EYE-LASHES -------------ARTIMATIC IN 05

*LOWER LASH-LINE
*REDDISH PINK---------------------BHCOSTMETIC [5TH EDITION]
*PURPLY-BURGUNDY ------------BHCOSMETICS [5TH EDITION}
*PURPLE-BROWN SHADOW-----BHCOSMETICS [5TH EDITION}

*WATERLINE------------------------KARITE BLACK GEL LINER 
*MASCARA -------------------------MAYBELINE COLOSSAL
*CHEEK-BONE GLOW------------MARYKAY BODY AND FACE BRONZER

LIPS
LIP-LINER -------------------------PINKISH RED COLOR
LIPSTICK-------------------------- CLASSIC IN LADY-GAGA
AIRWOMAN----------------------WINE

BLUSH
NAUGHTY GIRL------------------ HOT PINK

SETTING-SPRAY-----------------ZARON

BRUSHES USED:
*DOME HEAD BRUSH FOR PRIMER
*BLENDING BRUSH FOR TRANSITION COLORS [RANDOM MAC BRUSH]
*UNVEIL PRECISION BRUSH FOR 3RD TRANSITION COLOR
*BOBBI BROWN FLAT HEAD BRUSH FOR LID SHADOW
*REAL TECHNIQUES BASE BRUSH FOR BLENDING THE TRANSITION COLORS   TOGETHER
*BOBBI BROWN PENCIL BRUSH FOR UNDER LASH LINE 

PLEASE DON'T FORGET TO COMMENT, SHARE, LIKE AND ALSO SUBSCRIBE!

THANKS AND LOVE YOU ALL!

UNTIL MY NEXT POST.... BYE FOR NOW!

Friday, 10 February 2017

PRODUCTS USED IN THIS VIDEO


HEY GORGEOUS: Here are the list of products used in this particular video! Please comment, subscribe, share and like!


 *PRODUCTS USED LISTED ACCORDING TO THE WAY IT BEEN USED IN THE VIDEO:


         PRODUCTS                                           BRUSHES USED
PRIMER ------L.A. PRIDE CONTOUR PALETTE           A RANDOM DOME BLENDING BRUSH
 
TRANSITION COLORS
1st ---LIGHT BROWN EYESHADOW                                           MAC BLENDING BRUSH
2nd --- PEACHY-RED EYESHADOW                            RANDOM PRECISE BLENDING BRUSH
3rd --- BURGUNDY EYESHADOW                                                      ''                   "
 
EYE-LID:
BLACK GEL EYE-LINER ---------- KARITE                                SYNTHETIC ANGLE BRUSH
BLUE-GREEN EYESHADOW----- RANDOM                 BOBBI BROWN EYESHADOW BRUSH
GLITTERS ---GLITTER LINER ----USHAS                                    THE APPLICATOR
                 LOOSE GLITTERS-------CLASSIC IN 06            BHCOSMETICS SMALL BRUSH
EYELINER------------------------------MABROOK
EYELASHES   -------------------------RED CHERRY
LOWER LASH LINE:
SAME PROCESS AS THE LID CREASE COLOR
WATER LINE------- KARITE BLACK GEL LINER             REAL TECHNIQUES FINE LINER
MASCARA --------- VERYME FROM ORIFLAME
LIP-STAIN ---------- CLASSIC ---HOT-FLAME
BRONZER------------ RANDOM ONE(A BROWN-GOLD SHIMMERY EYESHADOW OR WORK FINE ASWELL)
BLUSH ---- HAUGHTY BEARING GIRL                            UNVEIL ANGLE BLUSH BRUSH
SETTING-SPRAY ----- ZARON COSMETICS
  
Incase you're wondering where to get most or some of these products?

I do makeup delivery internationally
Let me know!
Thanks for watching the video! 
And until my next post.... Bye for Now!
Kisses!

Tuesday, 7 February 2017

ILLUMINATOR VS HIGHLIGHTER: WHEN SHOULD YOU USE EACH?

Hey Loves...Welcome back for an exciting topic...very exciting but yet... seems very confusing to a lots of beauty divas.....a lot of you guys has been asking me  if Highlighter and Illuminator are the same, how to use it, when to use it and which comes first! Are they all just the same thing...or is the industry playing a mind game with us?

Read on........

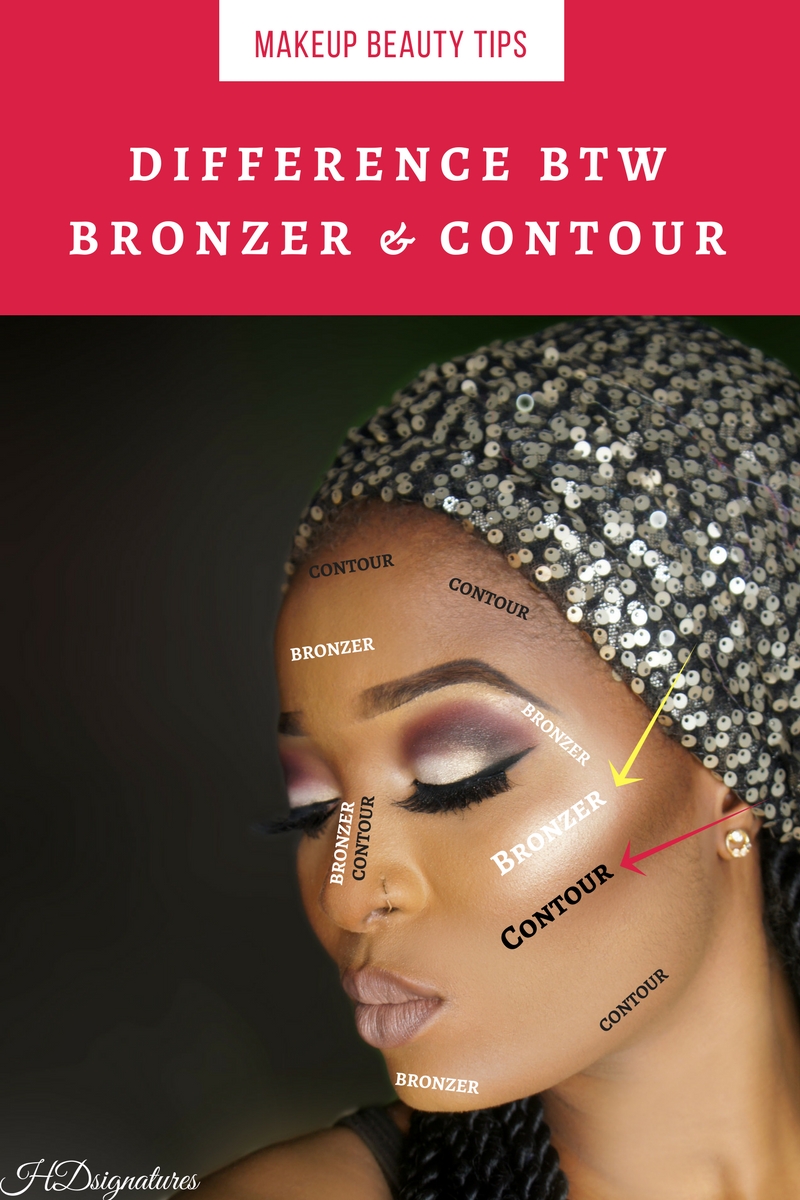
Both products have their different ways of defining ones beauty.... They both give the skin that angelic glow and bring out the best of our bone structures. One makes you glow while the other brings out the highest point of your face where light would hit naturally!
So lets look into how both should be used...........

First of all, lets see what each products means and how important it is to use them and what skin types can get away with it.

The main difference: "Highlighter is for a concentrated area of light, while an Illuminator casts light more generally.

Illuminator:
Illumintators are meant to be used under the foundation, or, in some cases, mixed with the foundation.
"If you're looking to enhance or create a feeling of vitality and light from within. Its add glow to your face underneath your foundation....this particular product....gives a dry skin a more luminous appearance while oily-skin should dread carefully!
illuminator comes in different forms,,,, e.g Powder form, Liquid form or creamy form......You should be careful when applying illuminators, because if its too much... it will make your skin look oily instead of shimmery. A nice dewy glow — that’s what we’re after.

How To Use It:
For the liquid or creamy form...Mix a little with your foundation or you apply a little on your face before your foundation and that should be after your primer then you can apply your foundation and set lightly with powder. but for Dry-skin....you can leave it on without setting it with powder because your skin types look goods when its luminous finish rather than matte!

Highlighter:
highlighter is usually used as a finishing touch, after the foundation and powder — it should probably be one of the last thing you apply to your face. Basically, think of the points you would like to highlight… cheekbones, brow bones,  the bridge of your nose.

How To Use It:
Highlighter should come before your blush... your blush should be placed in between your highlighter and contour.
To know the areas where your highlighter should be place....you'll want to form a triangular shape in the center of your face...i.e  *Above your brow archs, *center of your fore-head down to the bridge of your nose, *peak of the lips, *tip of the chin, *cheek bones, under your brow bones.

Using foundation, corrector, concealer and powder really gives you a great blank canvas to work with. But while they even out skin tone and hide blemishes, they also make your face very flat. By adding a little shimmer and highlighting and contouring, you’ll really be able to push forward the features you love the most!

Remember that...for every application... less is more!

Feel free to drop your comment below

Until my next post....by for now!


Thursday, 2 February 2017

JOHNSON BABY POWDER AS SETTINGS POWDER


Baby Powder = Setting Powder


Hey guys! Do you know that your BABY POWDER can actually serve as a SETTING POWDER?😳.....Am sure you guys will be wondering....how is that possible?

Well, it is and if you must know😜... I recently found out that... The key ingredient used in most high-ends brands like "Laura Mercier setting powder" to Low-end brand "Sacha butter-cup setting powder"...is TALC...yes Talc...this same ingredient is also included in baby powders🤔...that's the same reason why...when you apply a baby powder on babies...it makes that particular area dry for a long period of  time ....am sure you guys are nodding right now and saying .... Oh that's true!😀 Well....Let's continue...

DIRECTION FOR USE
Do your normal foundation, highlighting and contouring routine, ....then use your baby powder


(Johnson baby powder...Preferably) to set the areas you just highlighted. To do that, use a wedge sponge or a damped beauty blender to pack on a generous amount and apply it on to the highlighted areas for 5minutes....the longer you leave it there to set the dryer it becomes....  


Note: For a dark skin ...it should be left for 2 to 3minutes so as to avoid making those areas white-cast...light skin should leave it for 5minutes or how long you're leaving it is totally your choice of how dry/bright you want those areas to be.... 

*Tips: You can also use it as a form of catching eye-shadow fall-outs....😉

*Tip: Talcum powder can also be mixed with a powder or bronzer that is a bit too dark ...to lighten it up.

Gently sweep off the excess with a large fluffy powder brush after the stipulated time ....you can use your powder shade to tone the areas down if it shows a little bit of a white cast or you can leave it the way it is if you want more of a very bright under eyes....

Note: If your under eyes is prone to creases...Apply an eye-cream to blur out those lines 3minutes after your foundation base(Primer) and leave it for some minutes to sit there before you go ahead with your foundation routine and other good stuff.....

Feel free to leave your comments below and I'll see you guys with other tips and d.i.ys...

Bye😘